
 778-288-4358
Appliance-finish care guide
How to clean stainless steel appliances
For everyday marks on stainless steel appliances, start with the care instructions for the finish. Where permitted, wash with mild soap and water using a soft cloth, remove the soap with a clean damp cloth, then dry. Follow the visible grain rather than scrubbing across it.

Get your price
Tell us about your clean.
4.9 Google Rating· 5,000+ Homes Cleaned
 Background-Checked
 Quality Reviewed
 100% Happiness Guarantee
 24hr Cancellation
 4.9 Google Rating
 5,000+ Homes CleanedBackground-CheckedQuality Reviewed100% Happiness Guarantee24hr Cancellation
The important detail is not whether the door looks silver. A fingerprint-resistant coating can need different care from traditional stainless steel. Check that before reaching for polish or a homemade cleaner.
Identify the finish before opening the cleaner
Look up the appliance model in its use-and-care guide. Check each appliance separately; the fridge, dishwasher and oven do not necessarily have the same finish, even when they look like a matching set.
- Traditional stainless steel: follow the model's routine washing instructions and its approved product list for heavier marks.
- Fingerprint-resistant stainless: check the coating instructions. A bottle labelled for stainless steel is not automatically suitable.
- Black stainless or another coloured finish: use the instructions for that exact finish, not a method meant for bare metal.
For example, KitchenAid directs owners of its PrintShield finish to use mild soap, warm water and microfiber, and says not to use stainless cleaner or polish on that coating. Its finish-specific cleaning guide explains the distinction.
If you cannot identify the finish, ask the manufacturer before experimenting with a new product. Keep the model details handy so you do not have to repeat that search next time.
Wash rinse and dry one section
Set out clean soft cloths for washing, removing detergent and drying. Keep them separate from a cloth used on a greasy hob or gritty countertop. Let hot surfaces cool, and follow the appliance instructions around power, controls and openings.
Find the direction of the grain
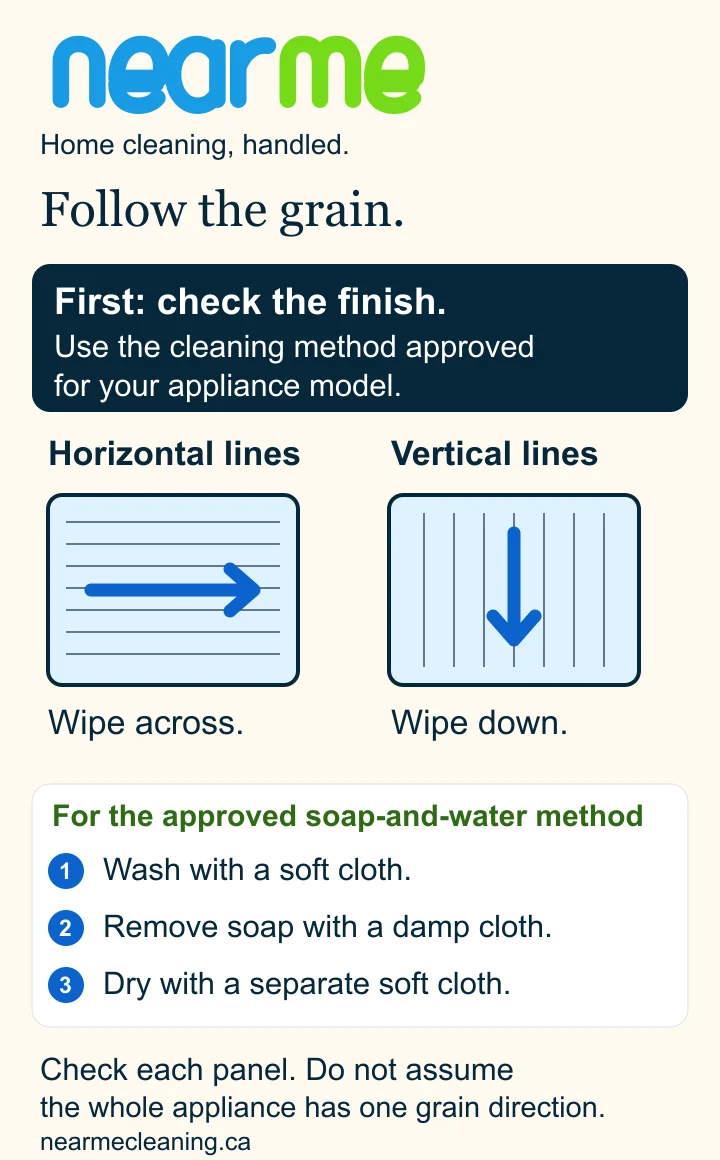
Look closely for the fine lines on the metal. Follow those lines with your cloth: across for a horizontal grain, down for a vertical one. Check adjoining panels rather than assuming every part runs the same way. Maytag's illustrated cleaning steps show why grain direction belongs at the start of the task.
Clean without spreading the residue
Use the permitted mild solution and a soft cloth to clean a manageable section. Turn to a clean part of the cloth as dirt transfers. Use a fresh damp cloth to remove detergent, then dry with a separate soft cloth before moving on. KitchenAid describes this wash, water-wipe and dry method in the guide above.
Keep polish away from plastic trim and rubber seals. Whirlpool distinguishes these materials from stainless surfaces in its appliance-finish care guidance. Controls also need their own care instructions; avoid spraying into openings or soaking electronic panels.
Check a streak before adding more product
If the surface looks worse after wiping, start with the process rather than another cleaner. These are first checks, not a diagnosis of every mark:
- Smears that move with the cloth: change to a clean cloth and remove the remaining product using the approved method.
- Marks left as water dries: dry a smaller section immediately instead of washing the whole appliance first.
- An oily film after earlier polishing: check the manufacturer's removal instructions. GE specifically recommends washing off mineral-oil cleaner residue before switching to its recommended cleaner; see its stainless-steel care guidance.
- A patch or scratch that stays unchanged: stop increasing pressure. Ask the manufacturer whether it is a cleaning problem or finish damage.
Do not use a scratch-removal kit, abrasive pad or vinegar recipe just because it worked on someone else's appliance. A cleaning method cannot be assumed to repair a damaged coating. Check the finish instructions before treating stubborn marks.
Include appliance exteriors in your kitchen clean
NearMe's Standard and Recurring Cleaning checklist includes appliance exteriors alongside kitchen counters, the backsplash, stovetop, sink and cabinet fronts. Share any finish-specific instructions before the visit, particularly if the appliance has a coating or an existing damaged patch.
Inside-fridge and inside-oven cleaning are separate selectable add-ons with every cleaning type. Exterior cleaning does not automatically include either interior. Use the refrigerator-cleaning guide if the shelves and drawers need attention too.
For the rest of the room, follow the kitchen deep-cleaning guide. If you would rather hand over the cleaning, compare the service checklist and get your NearMe price.
Home cleaning, handled.
NearMe customer evidence
What NearMe customers say
Authentic Google reviews describe NearMe detail, consistency and support around the appointment.
Read our Google reviews ↗“I’ve tried a couple of cleaning services in Vancouver before, but NearMe has honestly been the most reliable so far. We’ve been using them for a few months now for regular cleaning, and the difference is consistency. The cleaners show up on time, they don’t rush through things, and the place actually feels properly cleaned after they leave. What I like most is that it doesn’t feel random every time like with other companies. There’s clearly a system they follow, which makes a big difference. Pricing is fair for what you get, and booking has been pretty smooth as well. No back and forth or confusion. If you’re looking for a dependable house cleaning service in Vancouver, I’d definitely recommend giving them a try.”
“I’ve gone through a few house cleaning services in Vancouver over the years, and NearMe has easily been the most consistent. The booking process was straightforward, they arrived on time, and my home looked noticeably cleaner when they finished. It’s nice not having to follow up or remind anyone about the details. Highly recommend if you’re looking for a reliable cleaning service.”
“Prices are reasonable. Good cleaners and they provide their own supplies. You only need to supply your ow vacuum, mop, broom, etc. We initially got a cleaner who didn’t meet our standards, but they were able to send a better one after. Responsive with requests/inquiries. Had a couple of booking changes, but was able to correct within reason. Overall, good service!”
Guide sources
Sources and further reading
- KitchenAid: stainless-steel finishes ↗Different care for traditional stainless steel and PrintShield coatings.
- Maytag: cleaning stainless steel ↗Identifying the grain and following it while cleaning.
- Whirlpool: stainless-steel care ↗Finish-specific cleaning and protection for adjacent trim and seals.
- GE: stainless-steel care ↗Removing earlier cleaner residue and recognizing limits of ordinary cleaning.
Home cleaning, handled.
Leave the kitchen cleaning to NearMe
Get a price for your home cleaning, with appliance exteriors covered by the service checklist.